


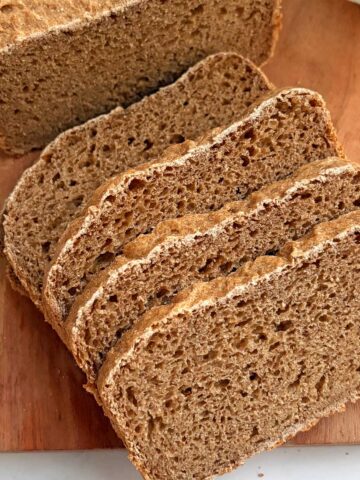
Milk bread is a delicious and soft bread. It is easy to make and can be used for your morning toast, making sandwiches, and grilled cheese for school lunches. It is a great alternative to other sandwich bread like the basic white bread which uses water and oil instead of milk and butter.
This is an easy milk bread recipe made in the bread machine using all-purpose flour. It is a dump and go recipe as the bread machine does all the tasks of mixing, kneading, rising, and also baking the bread.
If you prefer regular slices and your bread maker makes a tall bread then you can make the dough in the bread machine and bake the milk bread in the oven.
Ingredients
This milk bread is a basic milk bread and not the Japanese hokkaido milk bread that needs tangzhong. It requires only a few basic ingredients, easily available in the pantry. Bread flour or all-purpose flour, sugar, salt, yeast, and oil are what you will need along with milk.
Instead of bread flour you can use all-purpose flour which I have used for making this bread. Instant yeast or bread machine yeast will work well for this recipe.
I have used whole milk, you can use low-fat milk as well but you may need a little lesser quantity. You can also replace it with plant based milk.
Melted unsalted butter is needed but you can use the salted one and skip the salt in the recipe.

Instructions
Once you have all the ingredients, it is very easy to make this milk bread recipe in the bread machine. It is best to weigh the flour using a digital food scale for consistent results. Measuring flour using a measuring cup is inconsistent and can add more flour than needed resulting in very dense bread.
Depending on your bread machine, put the wet and dry ingredients in the bread pan based on the manufacturer's instructions. I have added milk, melted butter, sugar, salt, all-purpose flour, and instant yeast.
Now select the basic white bread cycle and the medium crust setting. Select the loaf size to 1.5 lb and start the cycle. The bread machine will do the rest of the job of mixing, kneading, rising, and finally baking.

Step 1: Gather all the ingredients.

Step 2: Add all the wet and dry ingredients to the bread machine pan.
I usually remove the paddle after the final kneading is done and then allow the final rise followed by the baking phase. This makes only a tiny hole at the bottom of the bread instead of a bigger hole created by the paddle.
Once the bread is baked, remove the pan from the bread machine and remove the bread. Leaving the bread in the pan after it is done can make the bread soggy. Once out, allow the bread to cool down completely before slicing it with an electric knife or a serrated bread knife.

Step 3: Watch the dough mix for 5-10 minutes and add some water or flour if needed.

Step 4: Once bread is ready remove the bread on a cooling rack.
You can also bake this bread in the oven if you want regular size slices to fit in the toaster. Once the bread dough is done with the final kneading, take it out from the pan on a lightly floured surface and shape it into a log of 8 inch to fit in the bread pan. Allow it to go through the final rise and then bake the milk bread in the oven at 350°F.
Substitutions
This bread machine milk bread is very easy to make and uses only 6 ingredients. There are a few substitutions that can work well in case you do not have all the ingredients.
- All-purpose flour - instead of bread flour, you can use all-purpose flour.
- Yeast - Instant yeast or bread machine yeast works fine in the bread machine. You can read more on which yeast to use in a bread machine.
- Butter - Salted butter can be used instead of unsalted butter and you can skip the salt in the recipe.

Variations
You can easily adapt this recipe to your liking and make it to your family's liking.
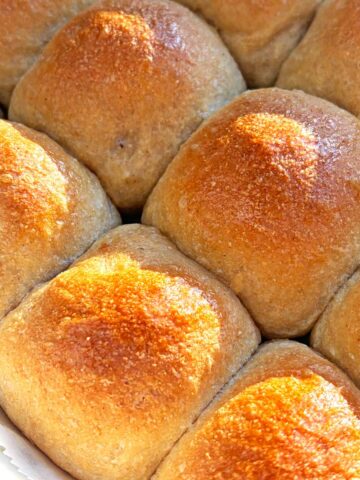
- Dinner rolls - this recipe can easily be adapted to make milk rolls. Make the dough using the dough cycle and then roll them into dough balls and bake them after a final rise.
- Bake in the oven - You can use the dough cycle and make the dough and then bake it in the oven for about 20-25 minutes at 350°F. Check out how to make dough in bread machine.
- Seed bread - add seeds of your choice like pumpkin, sunflower, flax, and chia to make seed bread.
- Fruit bread - add tutti frutti or candied fruits to make fruit bread.
Equipment
I have made this milk bread in the 2 lb. Hamilton Beach Artisan bread maker using the basic white bread cycle. This recipe should work well in any bread machine which can make a 1.5 lb loaf.
Once you remove the bread from the bread machine pan, allow it to cool down completely on a cooling rack, and then slice it with an electric knife or a serrated bread knife.
You can also check out these delicious bread machine recipes and vegan bread machine recipes.

Storage
Milk bread can be stored at room temperature for 4-5 days. It is best to keep it in a bread box or in an air-tight container. It is best not to store the bread in the refrigerator as it loses its moisture and becomes dry.
If you want to store the bread for a longer time, then slice the bread and then store it in the freezer. When you need them, just take out the required number of slices and toast them in a toaster.
Top tip
Measuring the flour with a measuring cup can give inconsistent results as the cup can be tightly packed while scooping the flour. So it is best to weigh the flour for a consistent result.
If you do not have a weighing scale then you can sift the flour and then spoon it in the measuring cup and level it.

If you enjoyed this recipe, you may also like
Don't forget to rate the recipe by clicking the stars. Also, pin the recipe by clicking the "Pin" button, for your future reference.
📖 Recipe

Bread Machine Milk Bread
Watch Video
Equipment
Ingredients
Wet ingredients
- 1 cup + 2 tbsp Milk (whole, microwave 20 seconds)
- 4 tablespoon Unsalted butter (melted)
Dry ingredients
- 1 tablespoon Organic cane sugar
- 1 teaspoon Salt
- 3 ½ cup Bread flour (420 grams or all-purpose flour)
- 2 ¼ teaspoon Bread machine yeast (7 grams or instant yeast)
Instructions
Bake in the bread machine
- Place the wet and dry ingredients in the order required by your bread machine.1 cup + 2 tbsp Milk, 4 tbsp Unsalted butter, 1 tbsp Organic cane sugar, 1 tsp Salt, 3 ½ cup Bread flour , 2 ¼ tsp Bread machine yeast
- Close the lid and select the "Basic" cycle, 1.5 lb size, and the preferred crust setting to "medium".
- The bread will be ready once the cycle completes.
- Remove the loaf by inverting the pan and shaking it.
- Place the bread on a cooling rack and allow it to cool down.
- Once the bread has cooled down completely, slice it with a serrated bread knife or an electric knife.
Bake in the oven
- Place the wet and dry ingredients in the order required by your bread machine.
- Close the lid and select the "dough" cycle.
- Once the cycle completes, remove the dough from the pan and shape it into a log of 8 inches in length.
- Place it in the bread baking pan (9 by 5 inches) and allow it to rise for about 45-50 minutes until it doubles in volume.
- Cover with a food wrap or a kitchen towel so that it does not dry up.
- Once it has doubled in volume, preheat the oven to 350 °F.
- Remove the food wrap gently and then place the pan in the oven.
- Bake for about 20 minutes or until the crust is golden brown in color.
- Transfer it to a cooling rack and allow it to cool down completely before slicing.
Notes
- Sifting and weighing the flour helps make the bread soft. Sifting is optional, however, weighing the flour gives consistent results.
- Once the bread is baked, remove it from the container and place it on a rack to cool. Leaving the bread in the container to cool down can make it moist.
- Recipe makes 1.5 lb. bread. To make 1 lb. bread change servings to 8 and for 2 lb. bread, change servings to 16.


Wanda says
Best bread recipe I have ever tried!
Alpa Jain says
Hi Wanda,
I am glad to hear that 🙂
Cheers,
Alpa
Anna Perry says
I am so impressed with your knowledge of baking with a bread maker. I bought one and returned it, now I have a KBS but it has no helpful instruction.
I received all five 5 lessons but for some reason number two is missing on how to use the dough setting. Would you be able to send it to me again?
Thank you Anna